Web Widget
Add a chat widget to your website so visitors can ask questions and get instant answers from your knowledge base.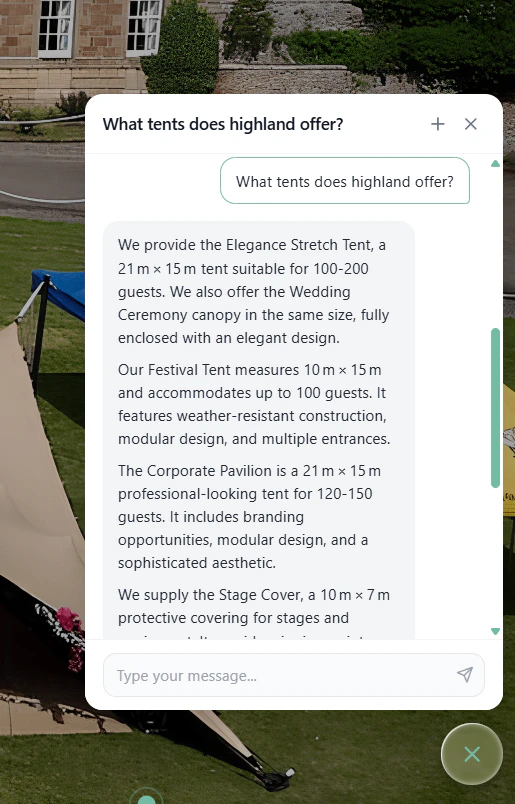
What You Get
- One line of code: paste a script tag and you’re done
- Dedicated knowledge base for your website
- Real-time streaming: answers appear word by word
- Customizable colors to match your brand
- Mobile friendly: full-screen on small devices
- No impact on your site: runs in an isolated Shadow DOM
- Response tracking: all widget conversations appear in your dashboard
Prerequisites
Before adding the widget to your website, make sure you have:A BestChatBot account with an active workspace
Content in your knowledge base (documents or URLs)
Access to edit the HTML of the website where you want the widget
Configure Your Widget
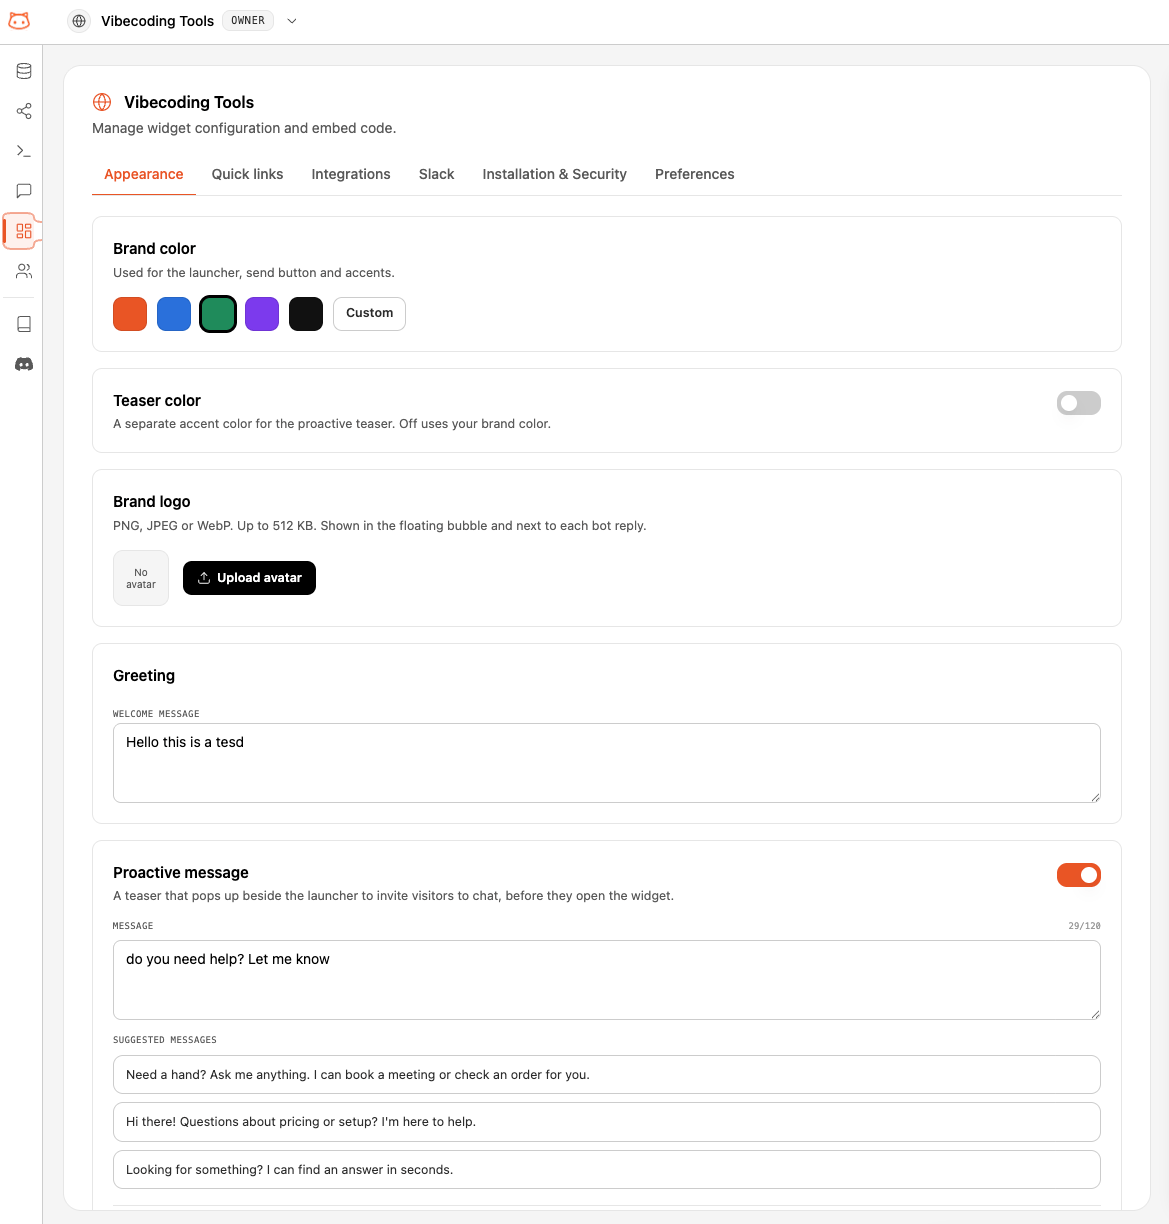
Each workspace comes with one web widget, created automatically when you set up the workspace. You don’t build it from scratch — you configure it. Click the globe icon in the sidebar to open your widget’s configuration, organized in tabs: Appearance, Quick links, Integrations, Slack, Installation & Security, and Preferences. Open the Appearance tab to style your widget:- Brand color: your brand color in hex (e.g.,
#F97316), used for the launcher, send button, and accents - Teaser color: an optional separate accent for the proactive teaser — off uses your brand color
- Brand logo: an optional image shown in the floating bubble and next to each bot reply (PNG, JPEG, or WebP, up to 512 KB)
- Greeting and Proactive message: the welcome text and the proactive nudge shown to visitors
Get Your Embed Code
Open the Installation & Security tab in your widget’s configuration to find a ready-to-paste snippet: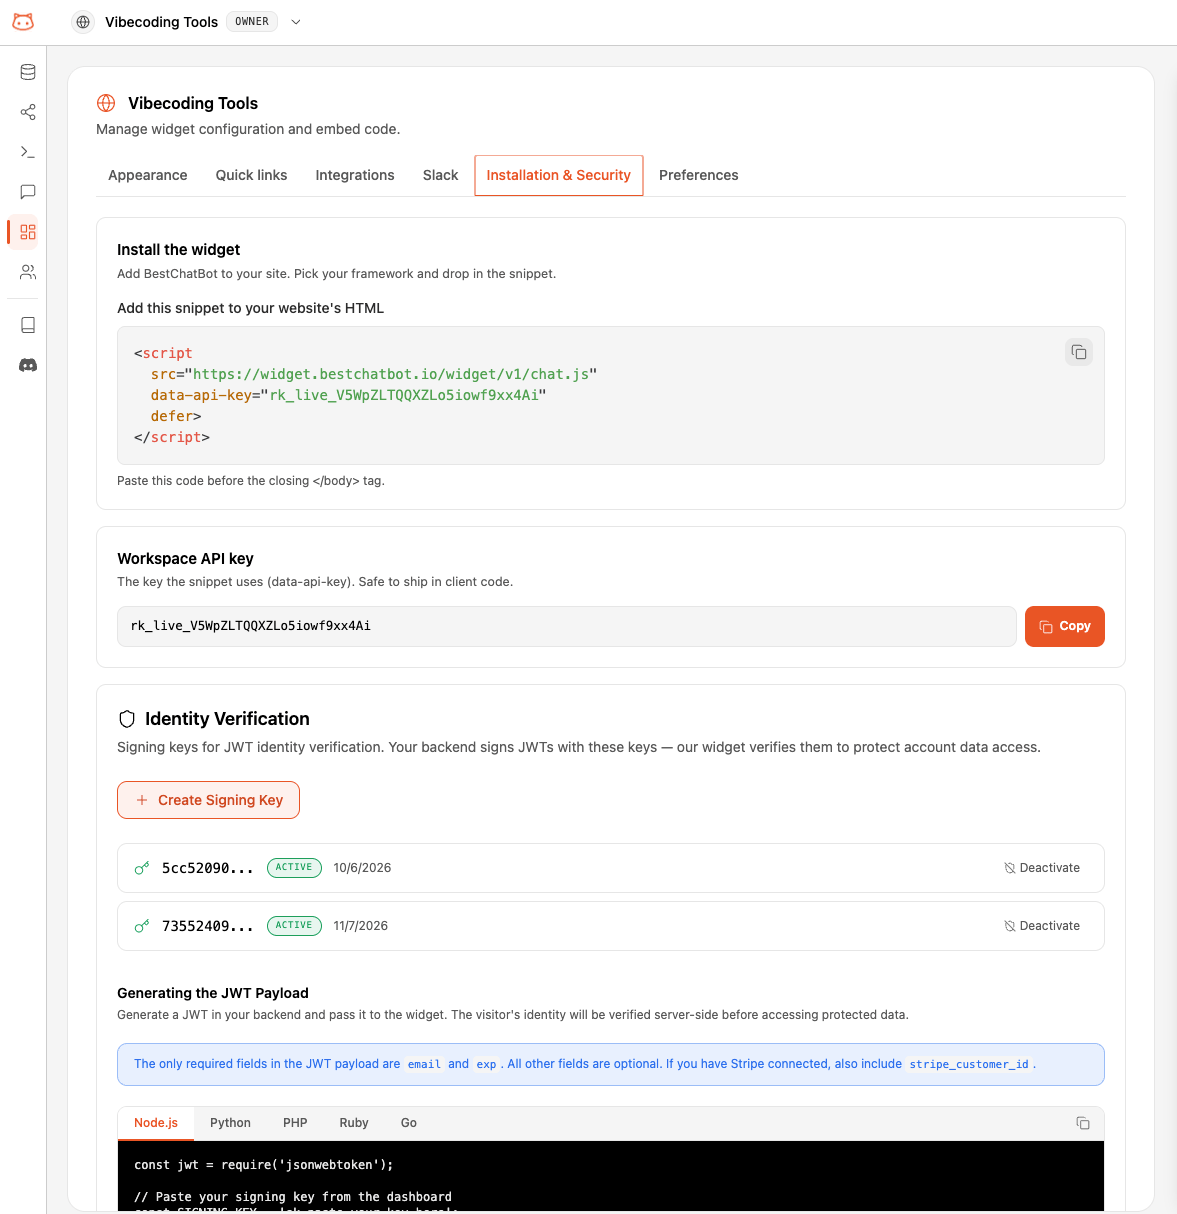
Install on Your Website
Paste the snippet into your website’s HTML, just before the closing</body> tag:
Platform-Specific Instructions
WordPress
WordPress
- Go to Appearance → Theme File Editor (or use a plugin like “Insert Headers and Footers”)
- Open
footer.php - Paste the snippet just before
</body> - Save changes
Shopify
Shopify
- Go to Online Store → Themes → Edit Code
- Open
theme.liquid - Paste the snippet just before
</body> - Save
Wix
Wix
- Go to Settings → Custom Code
- Click Add Custom Code
- Paste the snippet
- Set placement to Body - End
- Apply to All Pages
Squarespace
Squarespace
- Go to Settings → Advanced → Code Injection
- Paste the snippet in the Footer field
- Save
Next.js / React
Next.js / React
Add the script tag to your root layout or use the
next/script component:Static HTML / Other
Static HTML / Other
Paste the snippet before
</body> in your HTML file. Works with any website that supports custom HTML.How It Works
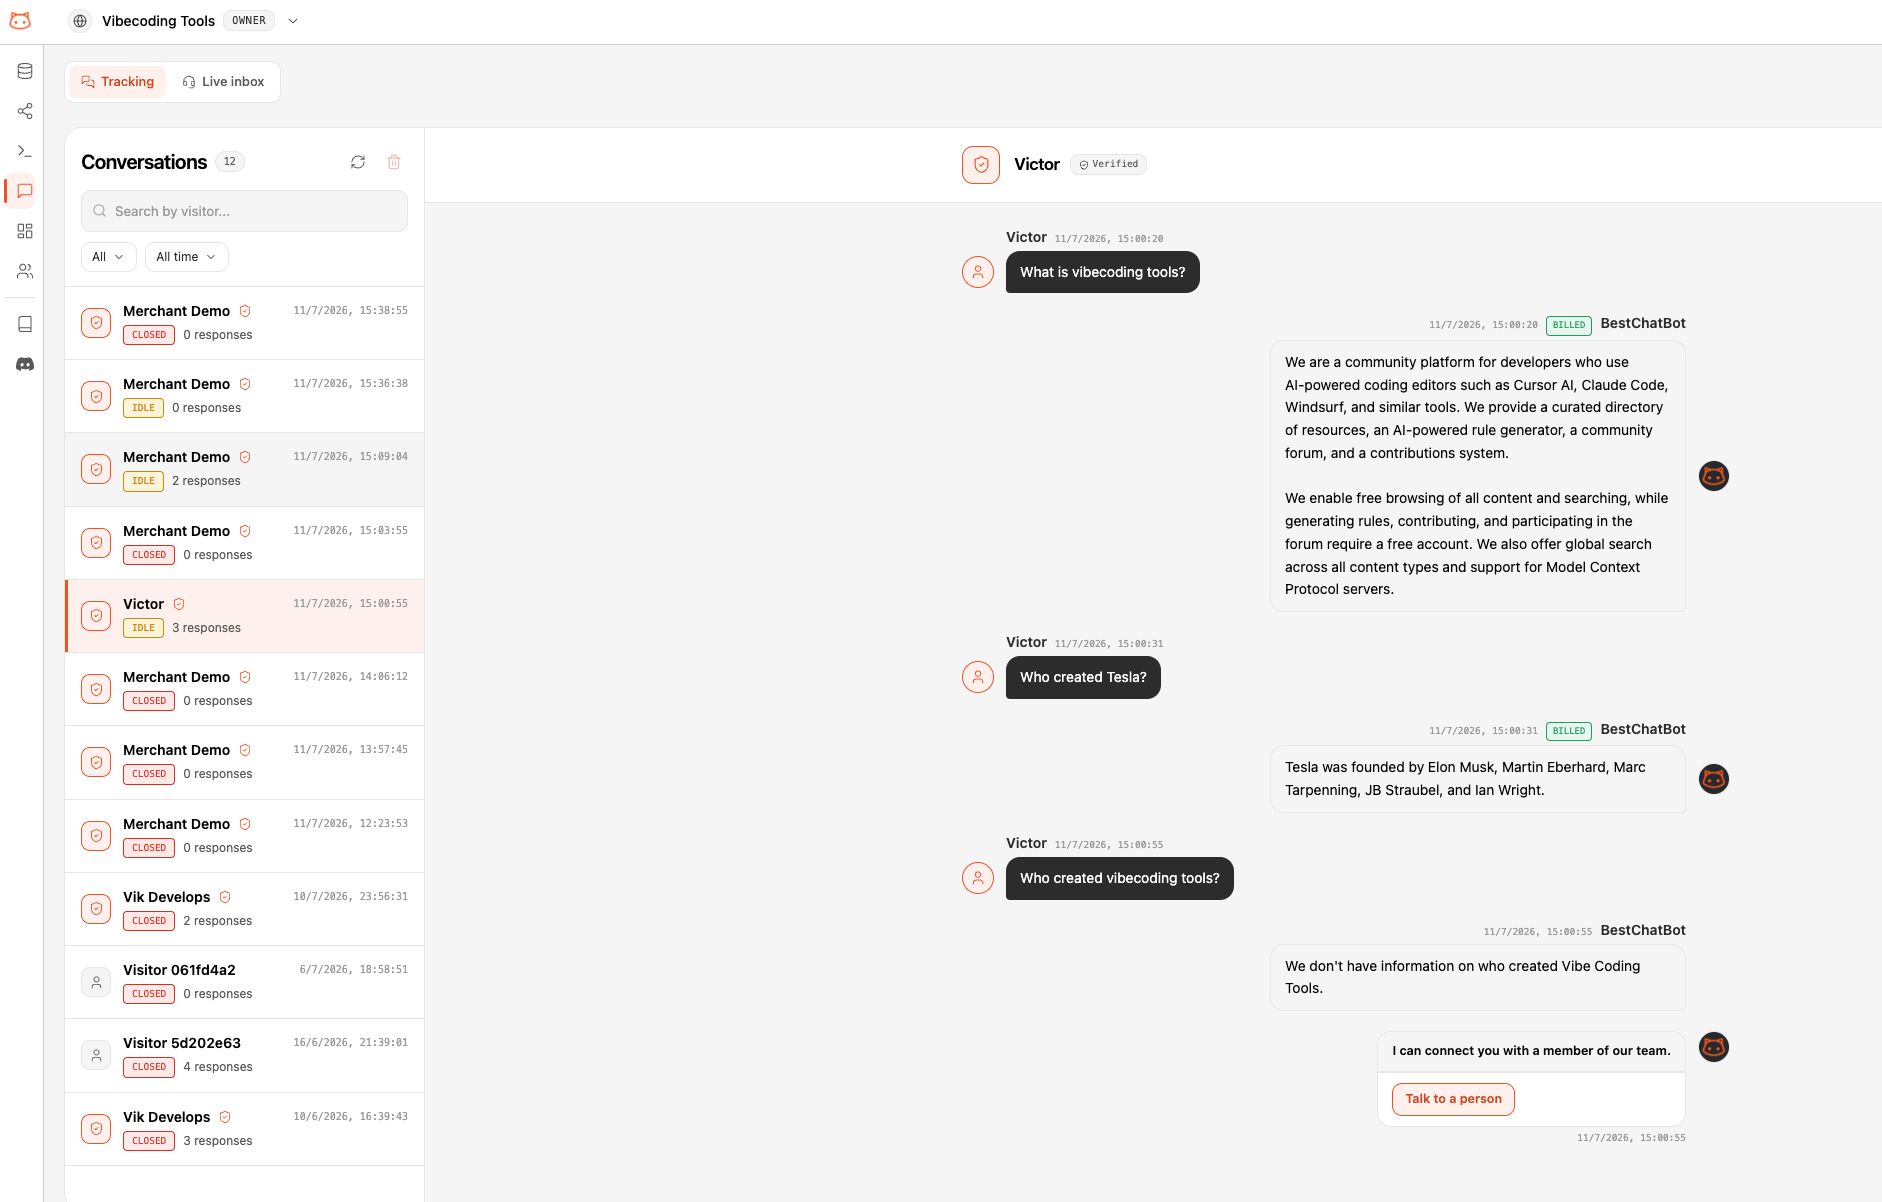
Once installed, the widget works like this:- Page loads → the script loads from BestChatBot’s servers
- Widget appears → a chat bubble shows in the bottom-right corner
- Visitor clicks → the chat window opens
- Visitor asks a question → the widget sends it to your knowledge base
- Answer streams in → the response appears word by word in real time
- Sources shown → relevant sources from your knowledge base are listed (expandable)
On the Pro and Business plans, the widget can also take real actions like booking meetings, opening support tickets, or looking up orders, through Agentic Actions.
Conversation Memory
The widget remembers the conversation within the same browser session. If a visitor navigates to another page, their chat history is preserved. Clicking the + button in the header starts a fresh conversation.Widget Settings
Click the globe icon in the sidebar to open your widget’s configuration. It has six tabs:Appearance
Style the widget: brand color, an optional teaser color for the proactive teaser, a brand logo, and the greeting and proactive message shown to visitors (covered above).Quick links
Add help links to your widget’s home screen. Each linked page is crawled so the bot can answer from its content. See Help Links.Integrations
Connect the tools your bot can act on (calendar, help desk, store, CRM, billing) so it can book meetings, open tickets, capture leads, and look up orders. See Agentic Actions and Available Integrations.Slack
Route live-chat handoffs to a Slack channel — your team replies in Slack while visitors keep chatting in the widget. See Connect Slack.Installation & Security
Everything to install and secure the widget in one place: the embed snippet and your workspace API key (covered above), signing keys for visitor identity verification (see Visitor Identity), and Allowed Origins — the domains where the widget may run, one per line, with wildcards like*.example.com supported (leave empty to allow all).
Regenerate API Key: If you suspect your API key has been compromised, click Regenerate Key. This immediately invalidates the current key, generates a new one, and requires you to update the snippet on your website.
”Powered by BestChatBot” Badge
The footer badge is shown by default on the Free and Starter plans. Upgrade to Pro or Business to hide it.Monitoring Widget Conversations
Every conversation from your web widget appears in the Conversations page of your dashboard, grouped by visitor session.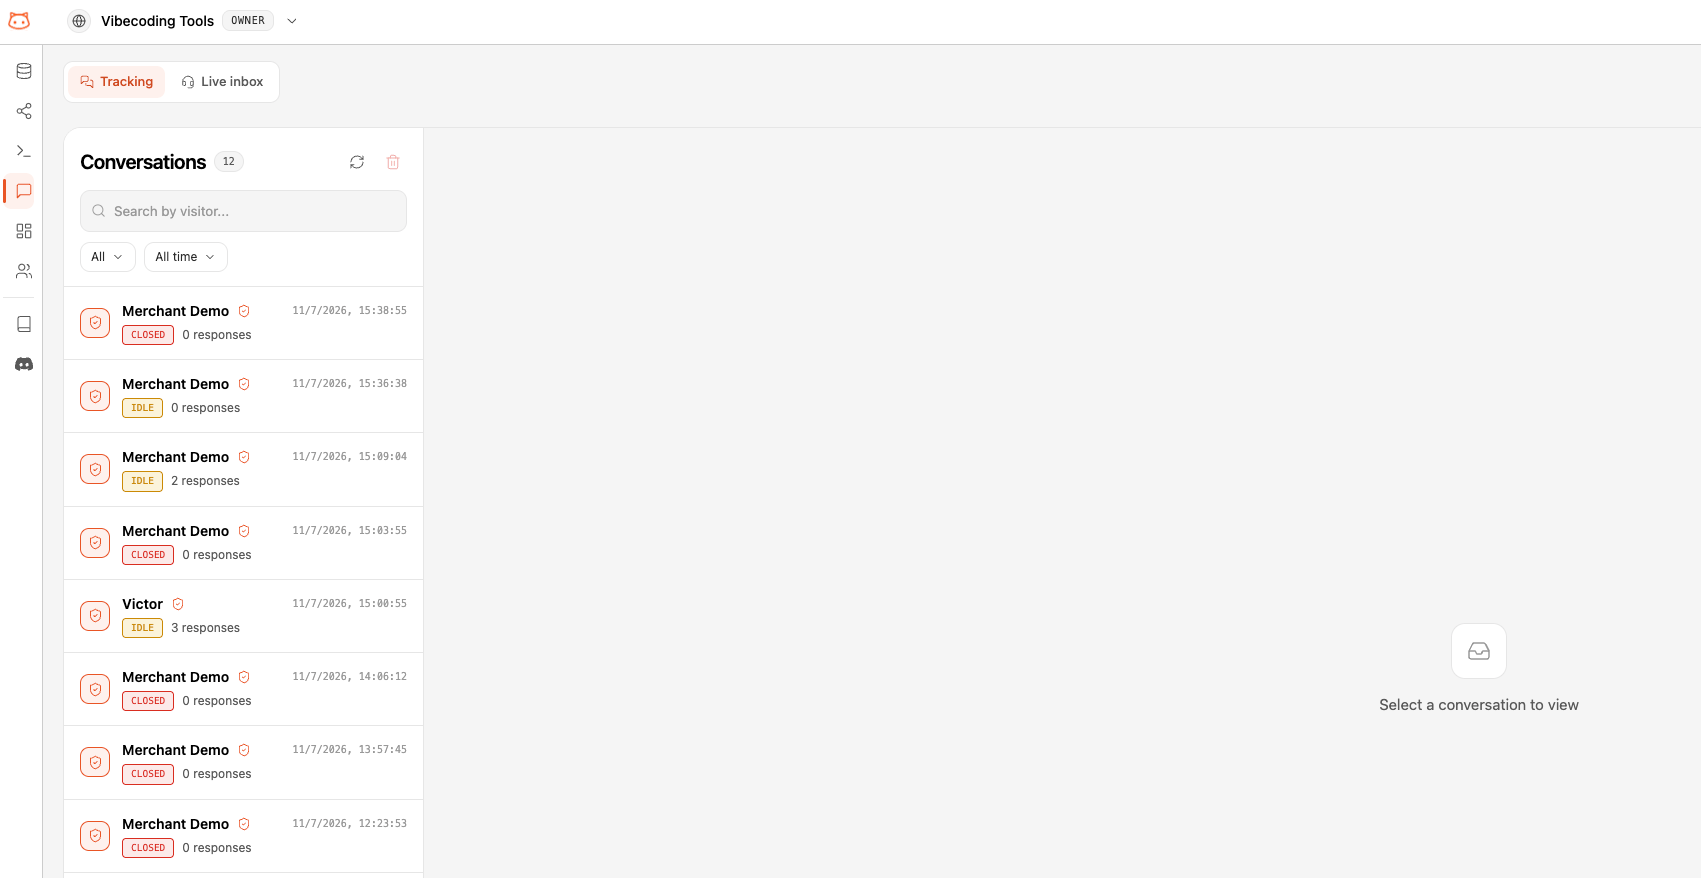
Mobile Experience
On screens smaller than 640px, the chat window automatically expands to full screen for a better mobile experience. The chat bubble adjusts its position to fit smaller screens.Advanced: Programmatic API
For developers who want more control, the widget exposes a JavaScript API onwindow.BestChatBot after it loads.
Available Methods
Examples
Open the widget when a button is clicked:The API is only available after the widget script has loaded. If you need to call it immediately, use
onReady() to wait for initialization.Compatibility
The widget works on all modern browsers:
The widget uses Shadow DOM for style isolation, which means it won’t conflict with your website’s CSS, and your CSS won’t affect the widget.
Troubleshooting
Widget doesn't appear
Widget doesn't appear
- Check that the
data-api-keyis correct - Verify your domain is in the Allowed Origins list (Widget Settings → Configuration)
- Open browser DevTools (Console tab) and look for
[BestChatBot]warnings - Make sure the script tag has the
deferattribute - Confirm the widget is active in your dashboard
Widget shows but doesn't respond
Widget shows but doesn't respond
- Check that your knowledge base has content and has been rebuilt
- Look for errors in the browser Console
- Verify your subscription is active
Styling conflicts
Styling conflicts
The widget runs inside a closed Shadow DOM, so conflicts are extremely rare. If you see issues:
- Check that you don’t have a global
* { all: unset }rule - Make sure no script is removing the
#bestchatbot-widget-hostelement
Widget appears on wrong pages
Widget appears on wrong pages
The script tag loads on every page where it’s included. To limit it:
- Add the snippet only to specific page templates
- Or use conditional loading with JavaScript:
Next Steps
Upload Documents
Add content for the widget to answer from.
Add URLs
Scrape your website content into the knowledge base.
Pricing Plans
Check plan features including widget limits.
Customize Responses
Set the bot’s tone and response length.