> ## Documentation Index
> Fetch the complete documentation index at: https://docs.bestchatbot.io/llms.txt
> Use this file to discover all available pages before exploring further.

# Web Widget

> Embed BestChatBot as a chat widget on any website with its own dedicated knowledge base.

# Web Widget

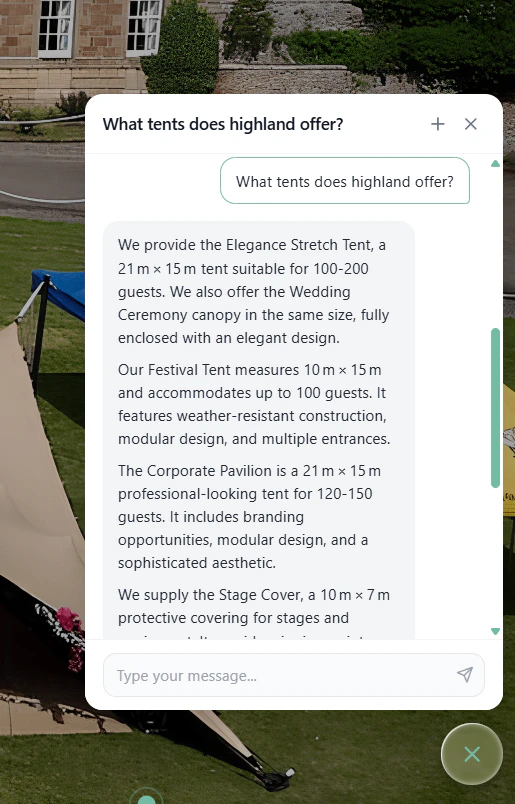
Add a chat widget to your website so visitors can ask questions and get instant answers from your knowledge base.
<Frame>
  <img src="https://mintcdn.com/bestchatbot/f1dLrYEbIflhrKGl/images/widget-chat-open.png?fit=max&auto=format&n=f1dLrYEbIflhrKGl&q=85&s=e063b8cd604be75b95392e920985cb34" alt="BestChatBot chat widget open on a real website showing a conversation" width="515" height="804" data-path="images/widget-chat-open.png" />
</Frame>

## What You Get

* **One line of code**: paste a script tag and you're done
* **Dedicated knowledge base** for your website
* **Real-time streaming**: answers appear word by word
* **Customizable colors** to match your brand
* **Mobile friendly**: full-screen on small devices
* **No impact on your site**: runs in an isolated Shadow DOM
* **Response tracking**: all widget conversations appear in your dashboard

***

## Prerequisites

Before adding the widget to your website, make sure you have:

<Check>A BestChatBot account with an active workspace</Check>
<Check>Content in your knowledge base (documents or URLs)</Check>
<Check>Access to edit the HTML of the website where you want the widget</Check>

<Tip>Each workspace runs one widget. To manage multiple sites or brands, create one workspace per widget.</Tip>

***

## Configure Your Widget

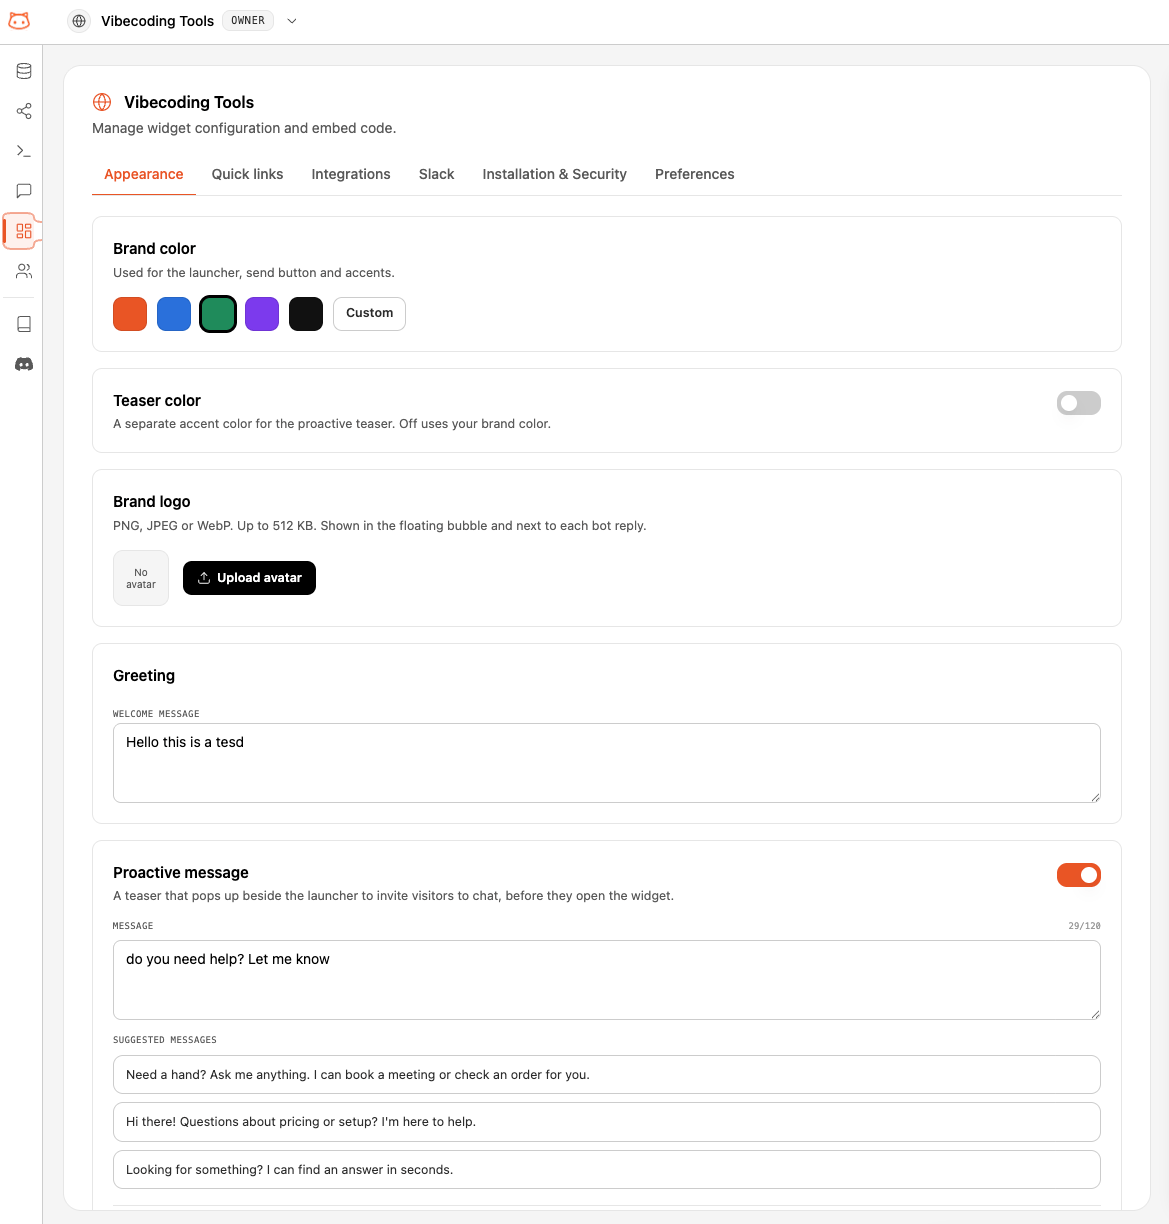
Each workspace comes with **one web widget**, created automatically when you set up the workspace. You don't build it from scratch — you configure it. Click the **globe icon** in the sidebar to open your widget's configuration, organized in tabs: **Appearance**, **Quick links**, **Integrations**, **Slack**, **Installation & Security**, and **Preferences**.

Open the **Appearance** tab to style your widget:

* **Brand color**: your brand color in hex (e.g., `#F97316`), used for the launcher, send button, and accents
* **Teaser color**: an optional separate accent for the proactive teaser — off uses your brand color
* **Brand logo**: an optional image shown in the floating bubble and next to each bot reply (PNG, JPEG, or WebP, up to 512 KB)
* **Greeting** and **Proactive message**: the welcome text and the proactive nudge shown to visitors
<Frame>
  <img src="https://mintcdn.com/bestchatbot/97kdRjnWT0Lew0EI/images/widget-configuration-tab.png?fit=max&auto=format&n=97kdRjnWT0Lew0EI&q=85&s=782574029dc26262fd5239d116caf427" alt="Widget Appearance tab with brand color, teaser color, brand logo, greeting, and proactive message" width="1169" height="1224" data-path="images/widget-configuration-tab.png" />
</Frame>

Click **Save Changes** to apply.

<Tip>To run a widget on more than one site or brand, create a separate workspace — each workspace has its own isolated knowledge base and its own widget.</Tip>

***

## Get Your Embed Code

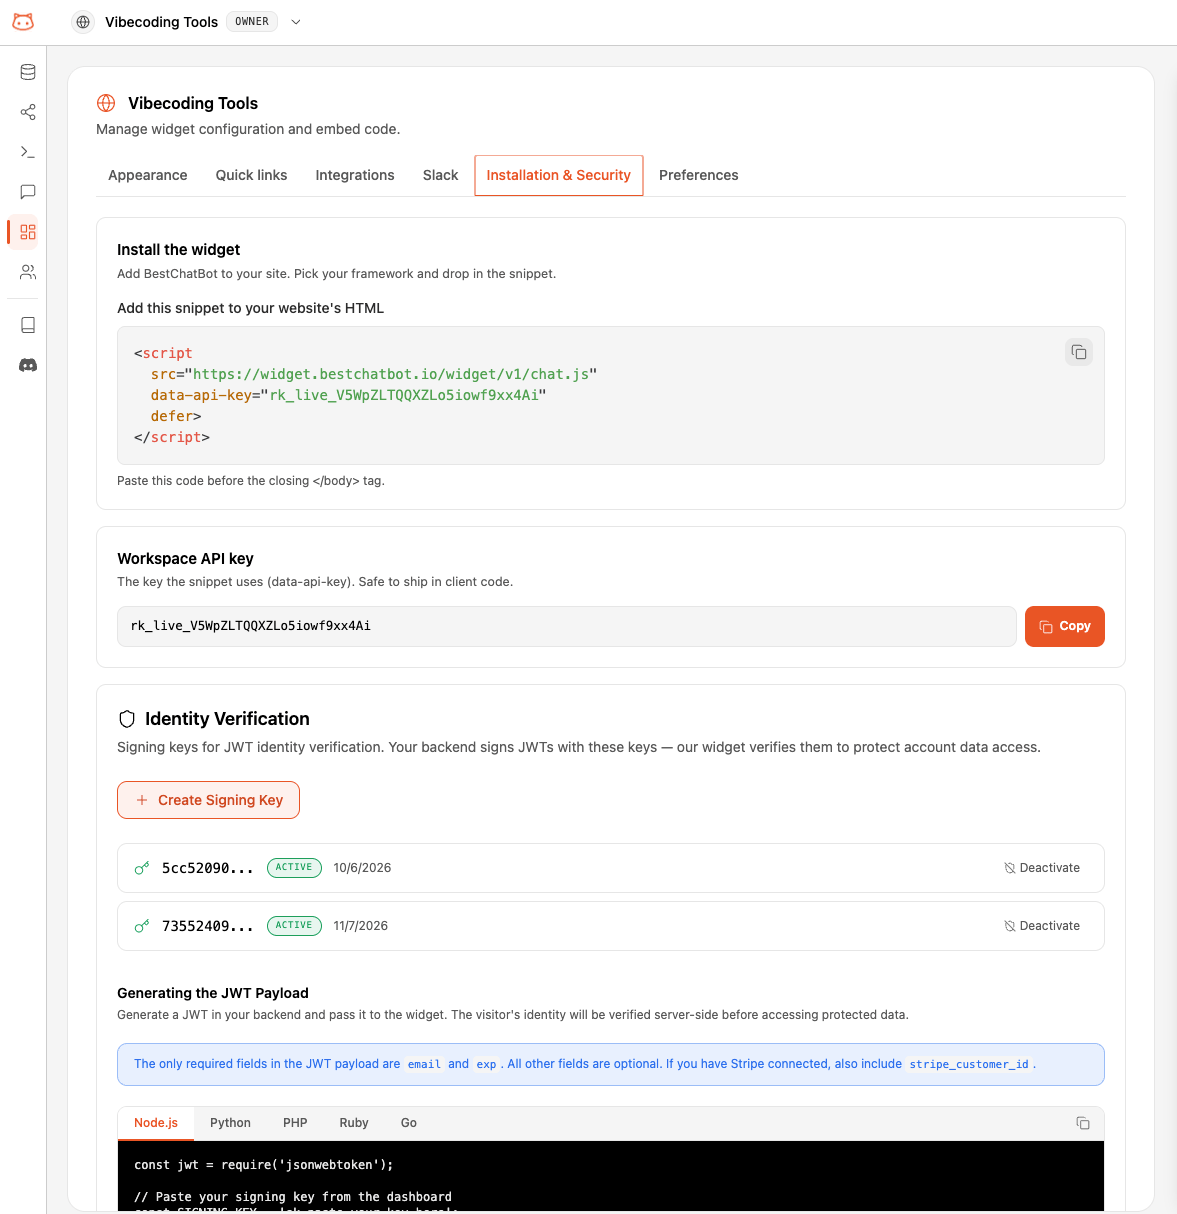
Open the **Installation & Security** tab in your widget's configuration to find a ready-to-paste snippet:
<Frame>
  <img src="https://mintcdn.com/bestchatbot/97kdRjnWT0Lew0EI/images/widget-embed-code.png?fit=max&auto=format&n=97kdRjnWT0Lew0EI&q=85&s=b128684febdd3a80643d4193072aae6d" alt="Embed Code dialog showing the script tag with instructions" width="1177" height="1214" data-path="images/widget-embed-code.png" />
</Frame>

The snippet looks like this:

```html theme={null}
<script
  src="https://widget.bestchatbot.io/widget/v1/chat.js"
  data-api-key="rk_live_xxxxxxxxxxxxxxxxxxxx"
  defer>
</script>
```

***

## Install on Your Website

Paste the snippet into your website's HTML, just before the closing `</body>` tag:

```html theme={null}
<!DOCTYPE html>
<html>
  <head>
    <title>My Website</title>
  </head>
  <body>
    <!-- Your website content -->

    <!-- BestChatBot Widget -->
    <script
      src="https://widget.bestchatbot.io/widget/v1/chat.js"
      data-api-key="rk_live_xxxxxxxxxxxxxxxxxxxx"
      defer>
    </script>
  </body>
</html>
```

That's it. The widget will appear as a floating chat bubble in the bottom-right corner of your site.

<Warning>Never share or modify the `data-api-key` value. It's your widget's unique identifier.</Warning>

### Platform-Specific Instructions

<AccordionGroup>
  <Accordion title="WordPress">
    1. Go to **Appearance → Theme File Editor** (or use a plugin like "Insert Headers and Footers")
    2. Open `footer.php`
    3. Paste the snippet just before `</body>`
    4. Save changes

    Alternatively, use a plugin like **WPCode** to insert the snippet site-wide without editing theme files.
  </Accordion>

  <Accordion title="Shopify">
    1. Go to **Online Store → Themes → Edit Code**
    2. Open `theme.liquid`
    3. Paste the snippet just before `</body>`
    4. Save
  </Accordion>

  <Accordion title="Wix">
    1. Go to **Settings → Custom Code**
    2. Click **Add Custom Code**
    3. Paste the snippet
    4. Set placement to **Body - End**
    5. Apply to **All Pages**
  </Accordion>

  <Accordion title="Squarespace">
    1. Go to **Settings → Advanced → Code Injection**
    2. Paste the snippet in the **Footer** field
    3. Save
  </Accordion>

  <Accordion title="Next.js / React">
    Add the script tag to your root layout or use the `next/script` component:

    ```tsx theme={null}
    import Script from 'next/script'

    export default function RootLayout({ children }) {
      return (
        <html>
          <body>
            {children}
            <Script
              src="https://widget.bestchatbot.io/widget/v1/chat.js"
              data-api-key="rk_live_xxxxxxxxxxxxxxxxxxxx"
              strategy="lazyOnload"
            />
          </body>
        </html>
      )
    }
    ```
  </Accordion>

  <Accordion title="Static HTML / Other">
    Paste the snippet before `</body>` in your HTML file. Works with any website that supports custom HTML.
  </Accordion>
</AccordionGroup>

***

## How It Works

Once installed, the widget works like this:

1. **Page loads** → the script loads from BestChatBot's servers
2. **Widget appears** → a chat bubble shows in the bottom-right corner
3. **Visitor clicks** → the chat window opens
4. **Visitor asks a question** → the widget sends it to your knowledge base
5. **Answer streams in** → the response appears word by word in real time
6. **Sources shown** → relevant sources from your knowledge base are listed (expandable)

<Note>On the **Pro** and **Business** plans, the widget can also take real actions like booking meetings, opening support tickets, or looking up orders, through [Agentic Actions](/integrations/agentic-actions).</Note>

### Conversation Memory

The widget remembers the conversation within the same browser session. If a visitor navigates to another page, their chat history is preserved. Clicking the **+** button in the header starts a fresh conversation.

<Tip>Conversation history is stored in the visitor's browser (localStorage). It's never shared between visitors or sent to third parties.</Tip>

***

## Widget Settings

Click the **globe icon** in the sidebar to open your widget's configuration. It has six tabs:

### Appearance

Style the widget: **brand color**, an optional **teaser color** for the proactive teaser, a **brand logo**, and the **greeting** and **proactive message** shown to visitors (covered above).

### Quick links

Add **help links** to your widget's home screen. Each linked page is crawled so the bot can answer from its content. See [Help Links](/customization/help-links).

### Integrations

Connect the tools your bot can act on (calendar, help desk, store, CRM, billing) so it can book meetings, open tickets, capture leads, and look up orders. See [Agentic Actions](/integrations/agentic-actions) and [Available Integrations](/integrations/available-integrations).

### Slack

Route live-chat handoffs to a Slack channel — your team replies in Slack while visitors keep chatting in the widget. See [Connect Slack](/live-chat/connect-slack).

### Installation & Security

Everything to install and secure the widget in one place: the **embed snippet** and your **workspace API key** (covered above), **signing keys** for visitor identity verification (see [Visitor Identity](/integrations/identity/overview)), and **Allowed Origins** — the domains where the widget may run, one per line, with wildcards like `*.example.com` supported (leave empty to allow all).

**Regenerate API Key**: If you suspect your API key has been compromised, click **Regenerate Key**. This immediately **invalidates** the current key, generates a new one, and requires you to **update the snippet** on your website.

<Warning>The old key stops working immediately. Update your website right away to avoid downtime.</Warning>

***

## "Powered by BestChatBot" Badge

The footer badge is shown by default on the **Free** and **Starter** plans. Upgrade to **Pro** or **Business** to hide it.

| Plan     | Badge  |
| -------- | ------ |
| Free     | Shown  |
| Starter  | Shown  |
| Pro      | Hidden |
| Business | Hidden |

***

## Monitoring Widget Conversations

Every conversation from your web widget appears in the **Conversations** page of your dashboard, grouped by visitor session.

<Frame>
  <img src="https://mintcdn.com/bestchatbot/97kdRjnWT0Lew0EI/images/conversations-tab-dashboard.png?fit=max&auto=format&n=97kdRjnWT0Lew0EI&q=85&s=5a4867e46a3fbace3320df78387010ef" alt="Conversations page listing widget conversations with status and response count" width="1701" height="878" data-path="images/conversations-tab-dashboard.png" />
</Frame>

Click any conversation to see the full exchange — the visitor's messages, the bot's answers, and any agentic actions it performed.

<Frame>
  <img src="https://mintcdn.com/bestchatbot/97kdRjnWT0Lew0EI/images/visitor-conversation-detailed.png?fit=max&auto=format&n=97kdRjnWT0Lew0EI&q=85&s=b88d4375d3af741531be28766180dd80" alt="Detailed view of a widget conversation showing the full exchange and agentic steps" width="1882" height="1202" data-path="images/visitor-conversation-detailed.png" />
</Frame>

<Tip>Each conversation is anchored to a visitor session, so you see the full back-and-forth, not just isolated questions. Learn more on the [Conversations](/using-the-bot/bot-responses) page.</Tip>

***

## Mobile Experience

On screens smaller than 640px, the chat window automatically expands to full screen for a better mobile experience. The chat bubble adjusts its position to fit smaller screens.

***

## Advanced: Programmatic API

For developers who want more control, the widget exposes a JavaScript API on `window.BestChatBot` after it loads.

### Available Methods

| Method                            | Description                                        |
| --------------------------------- | -------------------------------------------------- |
| `BestChatBot.open()`              | Open the chat window                               |
| `BestChatBot.close()`             | Close the chat window                              |
| `BestChatBot.toggle()`            | Toggle open/close                                  |
| `BestChatBot.destroy()`           | Remove the widget from the page entirely           |
| `BestChatBot.sendMessage(text)`   | Send a message programmatically (opens the window) |
| `BestChatBot.onReady(callback)`   | Run a function when the widget is ready            |
| `BestChatBot.onMessage(callback)` | Run a function when a new message arrives          |

### Examples

**Open the widget when a button is clicked:**

```html theme={null}
<button onclick="BestChatBot.open()">
  Chat with us
</button>
```

**Send a pre-filled question:**

```html theme={null}
<button onclick="BestChatBot.sendMessage('How do I reset my password?')">
  Help with password
</button>
```

**Wait for the widget to be ready:**

```javascript theme={null}
BestChatBot.onReady(() => {
  console.log('Widget is ready!')
})
```

<Note>The API is only available after the widget script has loaded. If you need to call it immediately, use `onReady()` to wait for initialization.</Note>

***

## Compatibility

The widget works on all modern browsers:

| Browser           | Supported |
| ----------------- | --------- |
| Chrome 80+        | ✅         |
| Firefox 80+       | ✅         |
| Safari 14+        | ✅         |
| Edge 80+          | ✅         |
| Mobile Chrome     | ✅         |
| Mobile Safari     | ✅         |
| Internet Explorer | ❌         |

The widget uses Shadow DOM for style isolation, which means it won't conflict with your website's CSS, and your CSS won't affect the widget.

***

## Troubleshooting

<AccordionGroup>
  <Accordion title="Widget doesn't appear">
    * Check that the `data-api-key` is correct
    * Verify your domain is in the Allowed Origins list (Widget Settings → Configuration)
    * Open browser DevTools (Console tab) and look for `[BestChatBot]` warnings
    * Make sure the script tag has the `defer` attribute
    * Confirm the widget is active in your dashboard
  </Accordion>

  <Accordion title="Widget shows but doesn't respond">
    * Check that your knowledge base has content and has been rebuilt
    * Look for errors in the browser Console
    * Verify your subscription is active
  </Accordion>

  <Accordion title="Styling conflicts">
    The widget runs inside a closed Shadow DOM, so conflicts are extremely rare. If you see issues:

    * Check that you don't have a global `* { all: unset }` rule
    * Make sure no script is removing the `#bestchatbot-widget-host` element
  </Accordion>

  <Accordion title="Widget appears on wrong pages">
    The script tag loads on every page where it's included. To limit it:

    * Add the snippet only to specific page templates
    * Or use conditional loading with JavaScript:

    ```javascript theme={null}
    if (window.location.pathname === '/support') {
      const script = document.createElement('script')
      script.src = 'https://widget.bestchatbot.io/widget/v1/chat.js'
      script.setAttribute('data-api-key', 'rk_live_xxxx')
      script.defer = true
      document.body.appendChild(script)
    }
    ```
  </Accordion>
</AccordionGroup>

***

## Next Steps

<CardGroup cols={2}>
  <Card title="Upload Documents" icon="file-arrow-up" href="/knowledge-base/upload-documents">
    Add content for the widget to answer from.
  </Card>

  <Card title="Add URLs" icon="globe" href="/knowledge-base/add-urls">
    Scrape your website content into the knowledge base.
  </Card>

  <Card title="Pricing Plans" icon="credit-card" href="/billing/pricing-plans">
    Check plan features including widget limits.
  </Card>

  <Card title="Customize Responses" icon="sliders" href="/customization/response-preferences">
    Set the bot's tone and response length.
  </Card>
</CardGroup>
